Most online applications for government exams in India asks for scanned photograph and signature in specific pixel size and image size such as –
Upload Scanned Images of Photograph and Signature:
The scanned images of photograph and Signature should be in jpg/jpeg format only.
Size of the photo image must be greater than 4 kb and less than 40 kb.
Size of the signature image must be greater than 1 kb and less than 30 kb.
Dimension of photograph image should be 3.5 cm(width) x 4.5 cm(Height) only.
Dimension of signature image should be 3.5 cm(length) x 1.5 cm(Height) only.
Such file size limits are set so that you do not upload an image which is huge. It is first of all unnecessary, will take longer time to upload and also consume more storage space on the web server.
Even a photograph taken with smartphones in high quality will be at least 3-4 MB in size. If 3000 candidates apply, it will be roughly 3 GB of photographs! That will be unnecessary wastage of storage space.
Before we go to the tools, here are some image sizes in terms of sizes in cm, inches and pixels:
| Size (cm) | Size (inches) | Size (pixels) (300 dpi) |
| 5.08×5.08 cm | 2×2 inches | 600×600 pixels |
| 3.81×3.81 cm | 1.5×1.5 inches | 450×450 pixels |
| 3.5×4.5 cm | 1.38×1.77 inches | 413×531 pixels |
| 3.5×3.5 cm | 1.38×1.38 inches | 413×413 pixels |
| 3×4 cm | 1.18×1.57 inches | 354×472 pixels |
| 5×7 cm | 1.97×2.76 inches | 591×827 pixels |
| 3.3×4.8 cm | 1.30×1.89 inches | 390×567 pixels |
(Source: http://www.idphoto4you.com/)
How to convert photo size in cm to pixels at certain DPI?
What if you are asked to upload passport photos with specific DPI (dots per inches) specification? Example: “The photo should be 3.5 cm x 4.5 cm at 100 DPI”.
In that case, a regular passport size used in India is usually 3.5 cm x 4.5 cm, and from the above chart we can see that:
3.5 cm x 4.5 cm photo = 1.38 x 1.77 inches = (1.38×300) x (1.77×300) pixels = 413 x 531 pixels at 300 dpi.
If the requirement is 100 DPI (Dots per Inches or Pixels per Inches) , that is if you are asked to upload a photography of 3.5 cm x 4.5 cm at 100 DPI, then the size in pixels will be:
3.5 cm x 4.5 cm photo = 1.38 x 1.77 inches =(1.38×100 )x (1.77 x 100) pixels = 138 x 177 pixels
Using the above conversion, we can now easily use the tools at our disposal to edit the photographs to upload.
Some photo editing tools you can use for editing photo width and height
Microsoft Paint (not recommended)
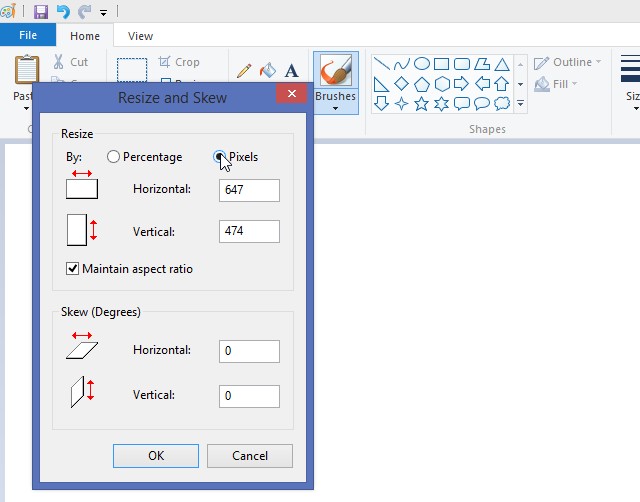
I have seen some friends and colleagues using Microsoft Paint to edit photographs. But Paint is actually a drawing program and not a photo editing program. So, the tools in Paint are not good enough for editing photographs. However, you can also use some of the features of paint to do some basic changes.
- Use the brush to remove spots
- Use crop to crop and keep only the required area – always take care of the aspect ratio when cropping. For passport sized photographs, it should be ideally 3:4 or 4:6.
If the aspect ratio is not maintained, you won’t be able to resize properly. - Use Resize to resize the image to required dimensions
- Paint always maintains the aspect ratio of the image loaded. That means, when you change the width, the height is also changed and vice-versa. If you have a soft copy of a passport photo with proper aspect ratio, then it should not be a problem. Otherwise, you will not be able to maintain the aspect ratio of the image.
Paint.NET
Paint.NET is an image and photo editing software for PCs that run Windows and based on the .NET Framework. Originally intended as a free replacement for the Microsoft Paint software that comes with Windows, it has grown into a powerful yet simple image and photo editor tool. Paint.NET depends on Microsoft’s .NET Framework 4.6, which is automatically installed if it isn’t already on the system.
Paint.NET is definitely more advanced than Paint and certainly with more features. Now, regarding the topic, Paint.NET is also recommended for editing photos for uploading to government exams application forms online. Paint.NET has a simple interface for that purpose. First Download and Install Paint.NET if not already installed. Download link given further below.
- Open Paint.NET
- Drag and drop your photo in the Paint.NET work space.
- When asked whether to open the image or add as a layer, select “Open“
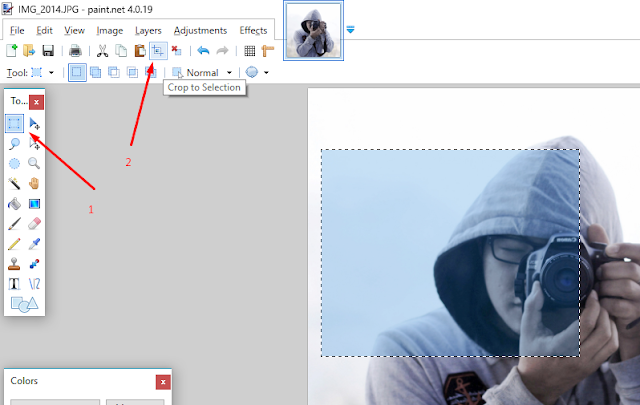
- If the photo is big and the orientation of the photo being edited is landscape mode, crop the photo to select only the required portion of the photo in the passport photo.
After cropping, you should have a photo in portrait orientation. So the aspect ratio is somewhat close. We now have to adjust the dimensions to fit the size requirements.
- Click on Image from the menu and select Resize.
Using Image Resize, you can use absolute size and disable maintain aspect ratio and start editing your image as desired. If the aspect ratio of the image you have cropped is exact, then you may also use “maintain aspect ratio”.
Using Paint.NET Image Resize control, you can edit your photo by adjusting the
- Pixel Size: specifies the size in pixels
- Resolution: how many pixels per inch or per cm
- and Print size: dimension in cm or inch
and see that the file size is within the requirements.
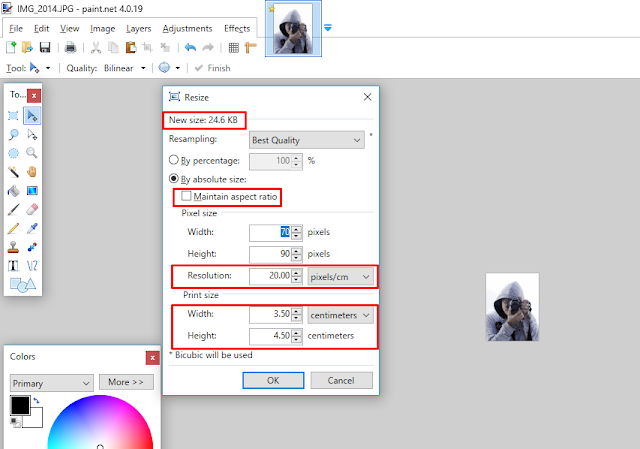
In the screenshot above, the adjustment have been made to fit requirement of 3.5×4.5 cm and file size below 40Kb. In some cases, dimension may also be mentioned in terms of pixels such as 110px x 140px.
If you are someone who is looking for light weight photo editing tool instead of heavy photo editing programs with tons of features which you may probably never use, then Paint.NET is worth checking out.
Download Paint.NET
Microsoft Office Picture Manager (Installed with MS Office)
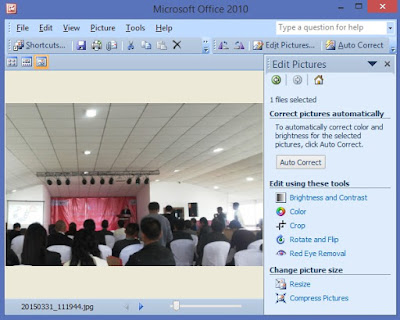
Microsoft Office Picture Manager is a basic photo editing tool and is a part of Microsoft Office Suite. Microsoft Office Picture Manager is an easy to use software and is ideal for quick edits.
Microsoft Office Picture Manager comes with MS Office prior to MS Office 2013. You can check whether you have Microsoft Office Picture Manager installed on your computer by following the steps below:
- From the Start menu, select All Programs.
- Click to open the Microsoft Office folder.
- Click to open the Microsoft Office Tools folder.
- Click Microsoft Office Picture Manager.
or you also find whether Microsoft Office Picture Manager is installed by checking the locations below:
- For 64 Bit OS/MS Word: C:\Program Files\Microsoft Office\
- For 32 Bit OS/MS Word: C:\Program Files(x86)\Microsoft Office\
If you can find OIS.exe in these two directories, then Microsoft Office Picture Manager is installed. Double click on OIS.exe to start.
If Microsoft Office Picture Manager is not found installed, get the Setup file of the MS Office and install again.
If you are using MS Office version from 2013 onwards, you need to install Microsoft Office Picture Manager separately.
To start Picture Manager do:
- From the Start menu, select All Programs.
- Click to open the Microsoft Office folder.
- Click to open the Microsoft Office Tools folder.
- Click Microsoft Office Picture Manager.
- If you cannot locate Microsoft Office Picture Manager from the above steps, navigate to C:\Program Files (x86)\Microsoft Office\Office12″ (Office 12 could be different in your case), and find “OIS.exe”. Double-Click to open.
OR
- Press Windows Start button on the keyboard, and then type “OIS”. Double Click to open.
Resizing photos with Microsoft Office Picture Manager
- Open Microsoft Office Picture Manager as described above
- Drag and drop your photo into the main area
- Click to open the photo
- Click “Edit Pictures” from the toolbar
- Do any editing required such as color adjustment, cropping off unnecessary area etc.
- Resizing: Click “Edit Pictures” from the toolbar
- From the right sidebar, click “resize“
- Choose custom width and height
- Enter the required width or height (but not both)
- Click “Edit Pictures” from the toolbar > use the “Crop” tool to adjust the width or height (whichever you left out in the above step).
Watch the size on the right sidebar as you crop, till the required dimension is reached.
How to get Microsoft Office Picture Manager if you don’t have it installed?
To find out if Microsoft Office Picture Manager is installed on your computer, you may try searching in all programs but it probably won’t show there at first. You can navigate to the installation directory of Microsoft Word on your computer and find “OIS.exe“. Depending on the Operating System and whether the Microsoft Word installed is 32 bit or 64 bit, the installation directory location can be –
- For 64 Bit OS/MS Word: C:\Program Files\Microsoft Office\
- For 32 Bit OS/MS Word: C:\Program Files(x86)\Microsoft Office\
If you can find OIS.exe in these two directories, then Microsoft Office Picture Manager is installed. Double click on OIS.exe to start.
With Microsoft Office Picture Manager you can manage, edit, share, and view your pictures from where you store them on your computer.
Unfortunately, Microsoft Office Picture Manager is no longer available in Office Suite starting from Office 2013. (Find out how to install Microsoft Office Picture Manager with Office 2013).
GIMP
GIMP is a free and open source image editing software. GIMP stands for GNU Image Manipulation Program, for X Windows systems. Most of the features in GIMP are somewhat similar to Photoshop.
You can do a lot with GIMP, but for the scope of this post, the following tools will be sufficient to meet the requirement:
- Menu > Image > Scale : to increase or reduce image size (use appropriate metric such as pixels, cm, mm etc)
- Menu > Image > Transform: to rotate images etc.
- Menu > Color : to adjust brightness, contrast, color balance, de-saturate etc.
- Menu > Tools > Transform Tools: to crop, rotate, move etc.

After editing, do “File > Export As” to save the edited image as .jpg or in any other image extension.
Adjusting the file size of the image:
While exporting enable preview to see the file size of the image being exported. This is a handy feature and it helps to bring the size of the image within the specifications.
To increase or reduce the file size, adjust the quality of the image by dragging the slider.

Using Adobe Photoshop (not a free software)
Adobe Photoshop is not a free tool but it is a great photo editing software. So, I thought of including in the list too. If you have Photoshop installed and are familiar with it, then it is very easy with Photoshop.
Let’s see how to bring down a photograph to 3.5 cm x 4.5 cm at 100 DPI.

- Open Adobe Photoshop
- Open the photo you want to edit.
(Let’s leave it in this tab for now) - Do File > New
- Select “Preset” = “Custom”
- Width = 3.5 cm and height =4.5 cm
- Resolution = 100 pixels/inch (because DPI means Dots/Pixels per Inch)
- Click OK
- Now we have a new photo size of 3.5 x 4.5 cm at 100 DPI, but it is blank
- Click on the previous tab where we have the photo to be edited.
- Make sure the “Move Tool” is selected. Drag the photo in the first tab with the move tool to the 3.5 x 4.5 cm blank photo we created in step 3 to 7. The image may be way out of scope, but don’t worry we will adjust in the next steps.
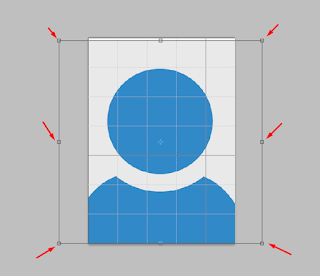
- Press CTRL + T on the keyboard to “transform” the photo imported.
- If you don’t see the image controls, it may be out of view. Press ALT+Mouse zoom to zoom-out
- Press and hold left SHIFT and click-drag the corners till the image fits well in the 3.5 x 4.5 cm image we created
- After you are satisfied with the photo, save it for web (File > save for web & devices) > select quality > see the size of the photo displayed in the preview pane.
- Click OK.
Check out Photo Editing softwares and reference materials:
GIMP Photo Editing 2022 Ultimate Image Processing – Software
Practical Paint.NET: The Powerful No-Cost Image Editor for Microsoft Windows


